Once you’ve installed nopea.media’s Print PDF Generator and Publisher plugin on your WordPress site, you can use it at any time in your text editor. The plugin comes with a PDF options control panel as well as specially designed PDF blocks that help you place your content into columns, add space, use info boxes or make column or page breaks. What’s worth noticing, is that making adjustments to your print article won’t affect the layout of the online article. You can preview both versions as you go by clicking “View PDF” (for print) and “Preview” (for web).
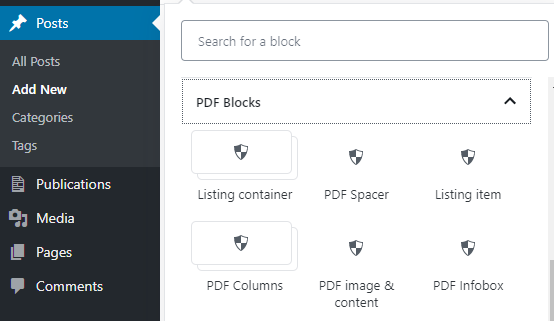
Find All Blocks From The “PDF Blocks” Category
Start writing your blog post or page in the WordPress Gutenberg text editor as you normally would, by adding the heading to where it says “Add title”. To make the content optimized for print / PDF, use the PDF blocks. Look for blocks by clicking the plus marks at the top-left corner or on the content area.

PDF Blocks
The Print PDF Generator and Publisher plugin comes with 15 PDF Blocks that all have specific features helping you achieve the desired look for your print-ready PDF publication. You can get by with using just a few but can easily make variations to the layout by using several. Next, we’ll go through the functionalities of each block.
PDF Columns: Content field you can divide into 1 to 3 columns
PDF Columns Image: Content field you can divide into 2 to 3 columns and add an image to the right upper corner
- With three columns, the image will be two columns wide. With two columns, the image will be one column wide
- Image size adjustable
PDF Image & Content: Block allowing you to place image and text side-by-side or one below another
- Place image: right, left or on top
- Image size adjustable
PDF Info box: Content field with adjustable background color and border
- Style and size adjustable
PDF Spacer: Adds empty space in between blocks with adjustable height
PDF 2 Columns: Two separate content fields that go side-by-side and both have one column
- Column width adjustable
PDF Column Break: pushes column content to next column
- Available in multiple column blocks (“PDF Columns” and “PDF Columns Image”)
PDF Page break: Pushes content to next page
Table of content, Listing container and Listing item + Table of content text area: Create your table of contents with these blocks
- Add first the table of content block, inside that a listing container and inside that individual rows i.e. listing items
- Use Table of content text area is you want to include other content (text or images) to the page
Fixed block: Allows you to make a fixed header or footer to a page (with background color)
PDF Title: Titles with adjustable font size and background color. Use especially for cover pages
Web Block: Use to show content only online (i.e. hide it from PDF)
Using general WordPress Blocks
In addition to the PDF-blocks, you can use only the following normal WordPress blocks:
- Paragraph
- Heading
- List
- Quote
- Table
- Image
- Separator
To add charts, the M-Chart plugin shortcodes work. No other shortcodes work.
Handling the Content in Blocks
In the WordPress Gutenberg text editor, each content, such as headings, text chapters and images are inside their own blocks. You can drag-and-drop blocks or relocate them by clicking the arrows on the side of each block. This makes layout designing intuitive and straightforward.

Looking at Block Navigation you can see all the blocks you’ve added, their structure and order. You can also go to your desired block by clicking it in the navigation.
It’s possible to place blocks inside one another. In the screenshot below, for example, there are headings, lists and paragraphs inside the columns of the PDF 2 Columns block.


By selecting a certain block, you can adjust its settings. The Block settings will appear on the right hand settings panel.
The example image presents settings for the block “PDF Columns”. You can adjust e.g. the number of columns, their margin and text alignment or fit content to a new page.
In PDF Image & Content blocks, you can adjust image position and content width to determine the image to text ratio on page width. In what you’re reading right now, we’ve used the block PDF Image & Content, with image positioned left and the text content being of value 4 (width).
Note! The PDF block adjustments will only be visible in the print-ready PDF, not online.
Adjusting the PDF File Settings

Along with the PDF Blocks, a Nopea.media menu will appear on your WordPress text editor once you’ve activated the plugin.
From this menu on the top-right corner, you are able to generate the print-ready PDF as well as adjust its settings to your liking. It’s here that you can also choose to add the article to a publication. These settings won’t affect the article’s online appearance.
You won’t need to adjust all settings – to convert your blog post into PDF, the main thing is that you select:
- “Generate PDF” (in order to generate the PDF)
- The PDF quality of your choice (print quality available in subscriptions Pro 2 and Pro 4)
- Heading position (on top of or under main image)
- Layout theme (“Guide Book”, “Magazine” or “Accessible”)
In addition to that, you can choose to adjust e.g. the PDF’s margins, size of featured image or add a background image to the page. You can also upload a separate PDF such as a cover page or an ad to add to the publication.
Settings In Detail
At the top of the PDF Options is the “Generate PDF” tick-box where you can choose to automatically generate a print-ready PDF from your content. A PDF is generated every time you click “Save draft” or “Update”.
“Show Footer” means a footer you’ve defined in the publication’s settings, will appear on this article. The footer can contain text and a page number. It will only show when you’re creating a publication, not when previewing one article.
By selecting the PDF Quality, you determine whether the PDF will be shared only online (Web) or if it will be sent to print (Print). Selecting “Print” means the article will be print-ready: images in PDF will be full-size and the document will include bleeds and crop marks. Selecting “Web” means the images will be smaller and the file won’t include bleeds. Due to its smaller file size, “Web” quality is better suited for sharing the PDF online or by email, or when printing it yourself. Note! Only web quality is included in Free and Basic versions of the plugin. If you wish to send your publications to professional printing, we recommend subscriptions Pro 2 or Pro 4.
From “Add PDF Page” you can add a separate PDF page as part of your publication (e.g. cover page or a full-page ad). See our article on how to add a PDF file to the publication.
From “Heading Position“, you can choose whether to place the main heading on top of main image or under main image. By selecting “on top of main image”, the main image will be on the background of the heading and the heading will also have a background color. If you don’t have a featured image or choose not to show it in print, the heading will get a background color with the selection “on top of main image”.
Adjust page margins if need be from the “PDF Layout Options“.
From “Image Size” you can choose the size of featured image in relation to the page size. Options are for the image to fill a quarter, a third, half, two thirds or three quarters of the page. From “Show Featured Image“, choose whether or not to show the featured image at all.
From Heading Size and Heading Style, adjust the size and style of your main heading. You can choose to hide the heading entirely or to underline it. For these selections, choose heading position “under main image”.
Selecting the theme is important for your articles to look cohesive in the publication. The themes are preset entities that determine e.g. the colors, fonts and font sizes of headings and paragraphs. It’s advisable to use the same theme throughout the publication. With the Free version of the plugin, you can use the theme “Magazine”. Other subscriptions have all three themes available. For a fully tailored service, we can create a fully customized theme. Have a closer look at the available layout themes.
From “Background Image“, add a background image to the page if you like.
From “Publications”, select which publication you want to add the article to. If you haven’t created a publication yet, you can do so on the left-hand Publications menu. The plugin’s Free version doesn’t support publications. With all other subscriptions you can create up to four annual publications.

Adding a Featured Image
Add your featured image to the article in the WordPress document settings panel. This will be your article’s main image online and by default in the PDF too. If you wish not to show the image on the printed article, adjust settings in the PDF Options panel by selecting “Show featured image –> No”. For the PDF you can also determine where to show the image: under heading or on top of heading.